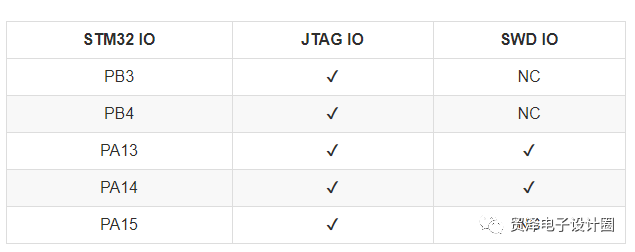
Recently, a project has used the STM32F103RB series of microcontrollers. Due to the small number of pins, the PB3 and PB4 pins of the microcontroller have to be used. These two pins are just the JTAG debug pins of the STM32 series. If you want to use the functions of ordinary IO, you need to make certain settings first.
1. STM32 debugging mode selection
STM32 supports both JTAG and SWD debugging modes, and both debugging functions are enabled by default.

From this we can know:
If you want to use the JTAG debugging function, then PB3, PB4, PA13, PA14, PA15 can not be used;
And if we turn off the JTAG function, but turn on the SWD debugging function, then PB3, PB4, PA15 can be used as normal IO;
The ST official 3.5 library has two interfaces that provide debugging off:
1.1 Turn off all JTAG and SWD debugging features
Use with caution, once the command is executed, the program will not be able to be programmed and downloaded by JTAG or SWD after the program is running. The remedial measures can be found at the end of the article.
RCC_APB2PeriphClockCmd(RCC_APB2Periph_GPIOB | RCC_APB2Periph_AFIO, ENABLE);
GPIO_PinRemapConfig(GPIO_Remap_SWJ_Disable, ENABLE);
After executing the above statement, PB3, PB4, PA13, PA14, PA15 can be used as ordinary iO, and debugging cannot be performed through J-Link at this time;
1.2 Turn off JTAG debugging only
The advantage of this method is that it liberates the pins occupied by the JTAG function, but the SWD debugging function can still be used.
RCC_APB2PeriphClockCmd(RCC_APB2Periph_GPIOB | RCC_APB2Periph_AFIO, ENABLE);
GPIO_PinRemapConfig(GPIO_Remap_SWJ_JTAGDisable, ENABLE);
After executing the above statement, PB3, PB4, and PA15 can be used as ordinary iOs, and can be debugged by SWD.
2. How to update the program and simulate after turning off JTAG and SWD debugging mode
2.1 How to close JTAG how to update the program
After the JTAG debugging function is turned off, the STM32 no longer supports online emulation, and the update program also needs to be completed by certain operations. This method is used with caution in the development phase!
It is recommended to delay the JTAG debug mode after the program starts for 3-5 seconds, so that the program can be programmed by clicking the burn button immediately after the power-off reset.
2.2 Remedial measures after turning off JTAG and SWD debugging functions
Remedy one:
Set the startup mode to ISP mode (BOOT0=1, BOOT1=0) or set the startup mode to RAM operation mode (BOOT0=1, BOOT1=1).
Power off the development board and power it on again. At this time, it is not in the user program mode, so the JTAG-disabled statement will not be executed, and the JTAG function can be used normally.
Remedy 2:
Set the startup mode to ISP mode (BOOT0=1, BOOT1=0), erase the FLASH of STM32 with the ISP program, and then restore the JTAG function.
Remedy three:
If your emulator supports SWD emulation mode, such as JLINK under IAR and ULINK2 under MDK. By directly setting the mode of the emulator to the SWD mode, it is not affected by this prohibition of JTAG function.
Pet Velcro Braided Sleeve,Pet Braided Sleeving,Pet Expandable Braided Sleeving,Cable Protection Sleeve
Shenzhen Huiyunhai Tech.Co., Ltd. , https://www.cablesleevefactory.com
