The Apollo project is loved and praised by many developers for its excellent system architecture, complete module functionality, good open source ecosystem, and standardized code style. However, in previous versions of Apollo, the perception, prediction, navigation, and planning modules all relied on high-precision maps, and the production of high-precision maps was cumbersome and opaque. For many developers, this is an insurmountable obstacle. Because there are no high-precision maps, many people can only use Apollo's simulation data package to view the scenery, and can't finish the real-car debugging of the real guns on the test road, which greatly reduces the Apollo project. The convenience is also not conducive to the development and growth of the auto-pilot open source community. Obviously, the Apollo project team has noticed this problem. After several months of hard work, it finally developed a new Relative Map-based navigation mode in version 2.5. Carry out commissioning on the test road.
Relative maps are new features introduced by Apollo 2.5. From the architectural level, the relative map module is the middle layer connecting the HD Map, Perception and Planning modules. The relative map module generates a map based on the body coordinate system in real time (the format is consistent with the high-precision map), and outputs a reference line for use by the planning module. From the perspective of developer friendliness, based on the relative map navigation mode, developers can implement real-vehicle debugging of test roads without relying on high-precision maps, which greatly reduces the developer's usage threshold.
The basic idea of ​​navigation mode is:
Record the driving trajectory on the test road by manual driving;
The original trajectory is processed by the Apollo tool to obtain a smooth trajectory. The trajectory is used to replace the navigation path output by the routing module, and is also a reference line (or guideline, centerline, reference line) used by the planning module. ), or generate a relative map baseline. In addition, the smooth trajectory can also be used to replace the reference lines of some lanes in the high-precision map (by default, the high-precision map uses the center line of the lane as a reference line. This method is not suitable under special circumstances such as temporary construction of roads. It needs to be used. Manually recorded and smoothed trajectories replace the lane reference lines of special roads, of course, this article does not discuss the content;)
The driver will drive the vehicle to the starting point of the test road, open the Navigation option in Dreamview and related functional modules, switch to automatic driving mode and start the vehicle;
During automatic driving, the camera of the perception module dynamically detects road boundaries and obstacles, and the relative map sub-module under the map module generates relative maps based on the reference lines and road boundaries in real time ( Using the relative coordinate system based on the current position of the vehicle as the origin, the planning module dynamically outputs the local driving path to the Control module according to the relative map output by the map module and the obstacle information output by the sensing module.
At present, the navigation mode only supports single-lane driving and can complete functions such as acceleration and deceleration, follow-up, obstacle deceleration and stopping, or bypassing obstacles when the lane width is allowed. The navigation mode of subsequent versions will be further improved to support Multi-lane driving, traffic signs and traffic lights detection.
This article describes the construction of Apollo version 2.5, reference line data collection and production, Dreamview front-end compilation configuration, and navigation mode usage. It is hoped that this will give all developers the convenience of using the new Apollo 2.5 navigation mode.
{ one }
Apollo 2.5 build
First download the Apollo 2.5 version of the source code from the GitHub website [https://github.com/ApolloAuto/apollo]. You can download it using the git command, or download the archive directly from the web page. After the source code is downloaded and placed in the appropriate directory, it can be built using two methods: 1. Build in the Visual Studio Code (recommended); 2. Build using the command line.
Of course, there is a precondition for both methods. Docker is already installed on your machine. A previous version of Apollo provided an install_docker.sh script file, because many developers reported that something could go wrong and the Apollo team removed the file. To install Docker now, you should refer to the help documentation of Docker's official website.
1.1 Build in Visual Studio Code
Open Visual Studio Code and execute the menu command File -> Open Folder. In the popup dialog box, select the Apollo project source folder and click OK, as shown in the following figure:
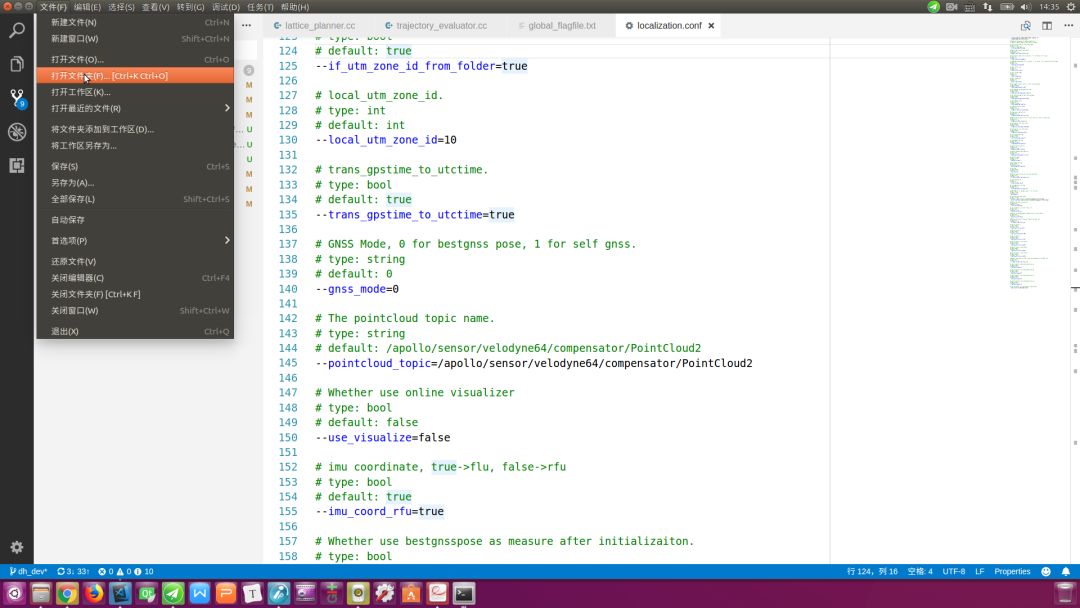
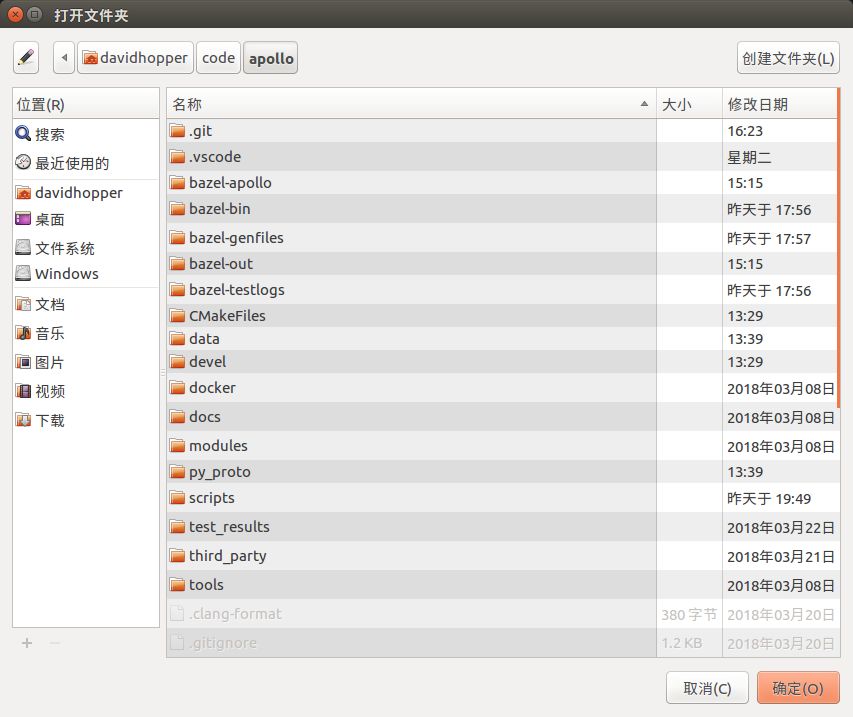
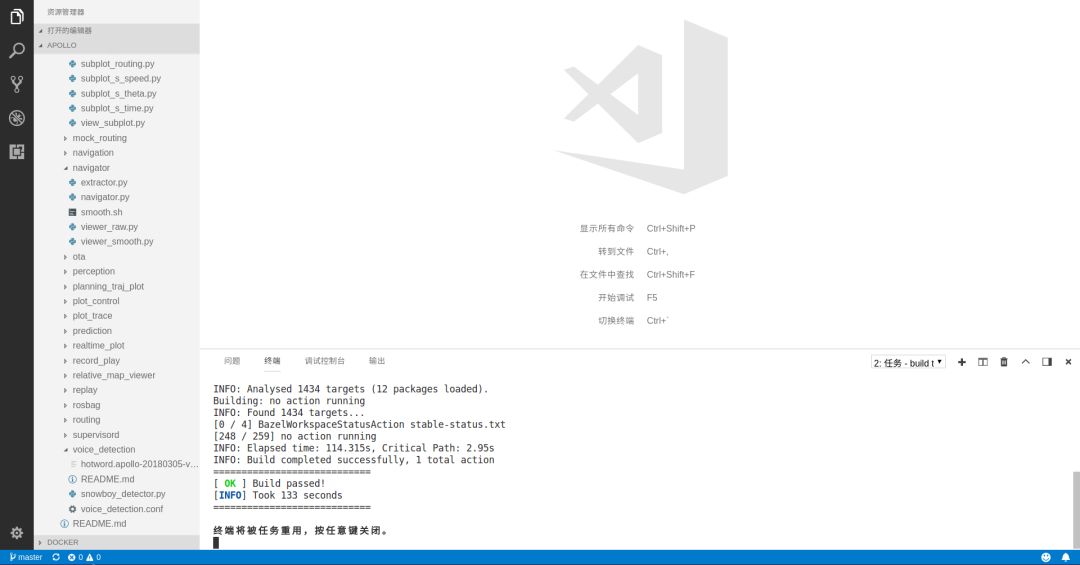
After that, execute the menu command Task -> Run Generate Task or directly press the shortcut Ctrl + Shift + B (consistent with the shortcut keys of Visual Studio and QT) to build the project. If Docker has not been started before, then Docker will be started when compiling. Enter the supervisor password in the bottom terminal window. After the command execution is completed, if a successful build message is displayed at the bottom (as shown in the figure below), the build was successful. The entire process must keep the network unblocked, or you can't download the dependencies. The build process may encounter some problems. The solution can be directly viewed on the GitHub website's help documentation.
1.2 build in the command line
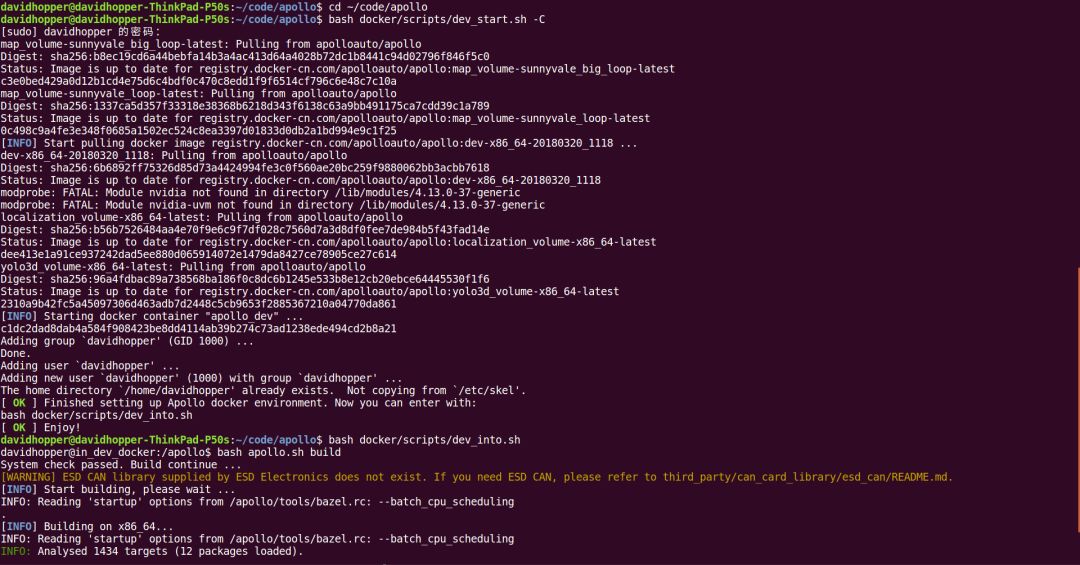
Press the shortcut Ctrl + Alt + T to open the command line terminal and enter the following command to start Docker:
| 123 | Cd your_apollo_project_root_dir# From Mainland China, it is best to add "-C" option to directly access the Chinese mainland mirror server for faster download speed bash docker/scripts/dev_start.sh -C |
Enter the following command to enter Docker:
| 1 | Bash docker/scripts/dev_into.sh |
Inside Docker, execute the following command to build the Apollo project:
| 1 | Bash apollo.sh build |
The entire operation is shown in the following figure:
1.3 Modifying the Positioning Module UTM Area ID
The Apollo Project Localization module uses UTM coordinates in the U.S. West by default and needs to be modified in the country. Outside Docker, use vi or another text editor to open the file [apollo project root]/modules/localization/conf/localization.conf with the following content:
| 1 | --local_utm_zone_id=10 |
Amend to the following (This is the UTM area ID for Changsha area. For the UTM area in China, please refer to this page [http://]):
| 1 | --local_utm_zone_id=49 |
**Note: If you did not modify the above content while recording the data, you can only use the offline analog test to play back the data packet. You must not change this value. Otherwise, the positioning of the reference line on the map will be incorrect! Once I collected the data, I forgot to change the value and modify it when playing back the data. As a result, the reference line was positioned on the west coast of the United States! I canceled the change, and the display returned to normal after pressing F5 to refresh the browser.
{Second}
Collection of reference line raw data
Import the Apollo project file that has been built into the in-car IPC, and enter Docker as in step 1.2. Then execute the following command to start the Dreamview server program:
| 1 | Bash scripts/bootstrap.sh |
Open the webpage in the browser http://localhost:8888 (be careful not to use the proxy), enter the Dreamview interface, as shown below:
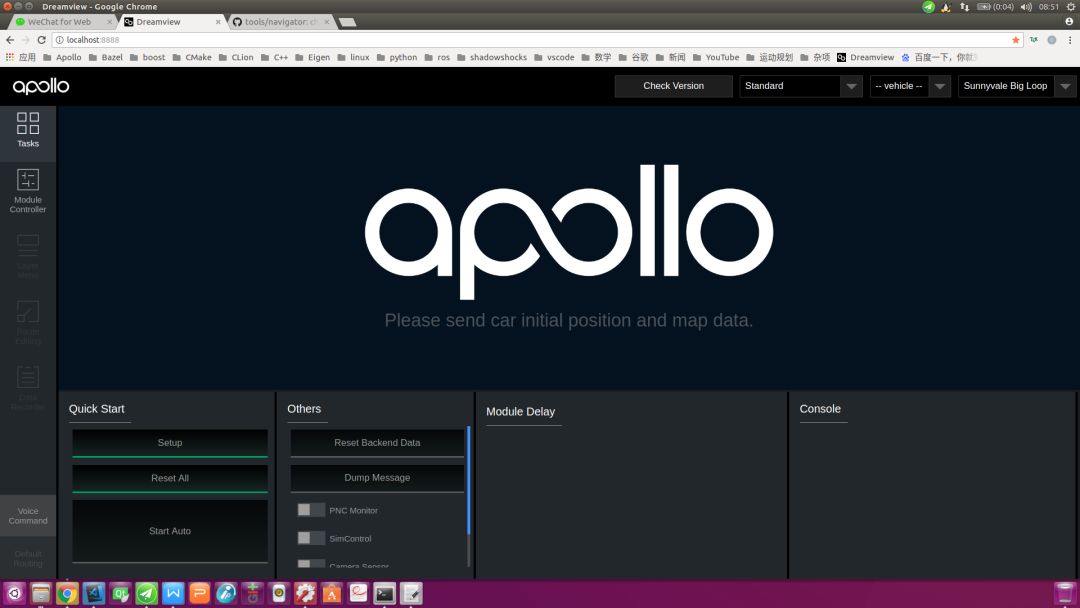
1. The driver will drive the vehicle into the starting point of the road section to be tested;
2. The operator clicks on the Module Controller button in the left toolbar of the Dreamview interface to enter the module control page and selects the GPS, Localization, and Record Bag options. **Note: If the collected data packets are used for offline simulation tests, you need to Plus CAN Bus option.
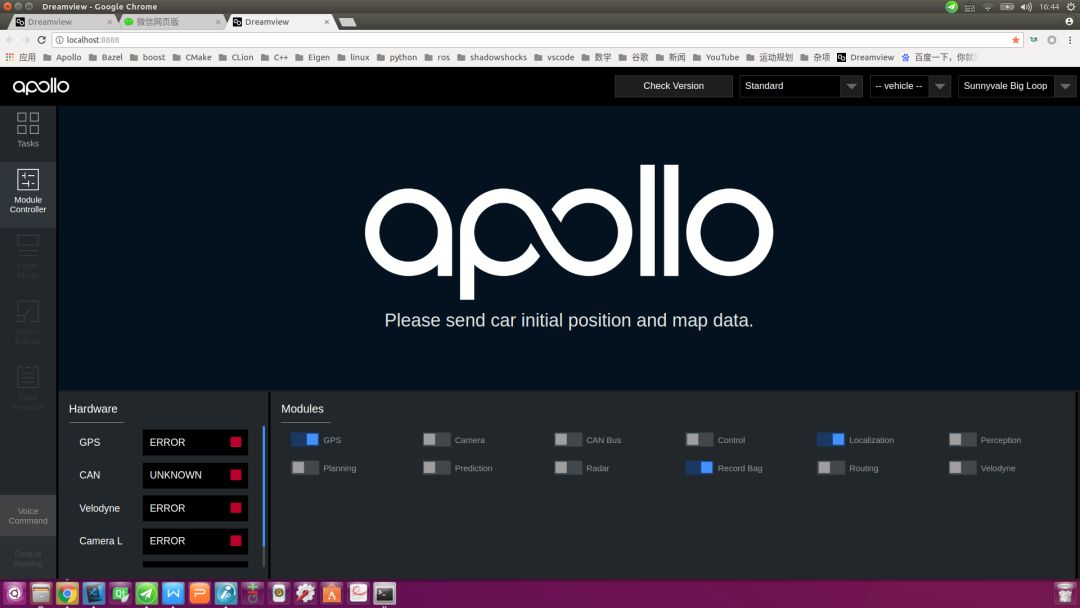
3. The driver starts the vehicle from the starting point and runs on the predetermined route to the end;
4. The operator closes the Record Bag option in the Dreamview interface. This will be in the /apollo/data/bag directory (this is the directory in Docker. The corresponding directory on the host is [your apollo root directory]/data/bag A directory similar to 2018-04-01-09-58-00 is generated in this directory, which holds a packet similar to 2018-04-01-09-58-00.bag. This is the packet we need. Remember its path and name. **Note: The default recording time for a single packet file is 1 minute and the default file size is 2048MB. You can change the default value by modifying the file /apollo/scripts/record_bag.sh.
For the sake of future explanation, I assume that the packet 2018-04-01-09-58-00.bag is stored directly in the /apollo/data/bag directory.
{ three }
Making reference lines
The production of the reference line can be accomplished either in the in-vehicle IPC or on other computers. No matter which computer we are working on, we first assume that Docker has been entered as per step 1.2 and that the packets recorded in step 2 are placed in the /apollo/data/bag directory, assuming the file is named 2018-04- 01-09-58-00.bag (This is not the case on your machine. This is only for the sake of convenience).
3.1 Extract Raw Data from Raw Packets
Inside Docker, use the following command to extract raw data from the original package:
| 12 | Cd /apollo/modules/tools/navigatorpython extractor.py /apollo/data/bag/2018-04-01-09-58-00.bag |
The above command will generate an extracted raw data file in the current directory (knowing we are in the /apollo/modules/tools/navigator directory): path_2018-04-01-09-58-00.bag.txt.
In order to verify the correctness of raw data, you can use the following command to view:
| 1 | Python viewer_raw.py ./path_2018-04-01-09-58-00.bag.txt |
A road map similar to the one below is displayed:
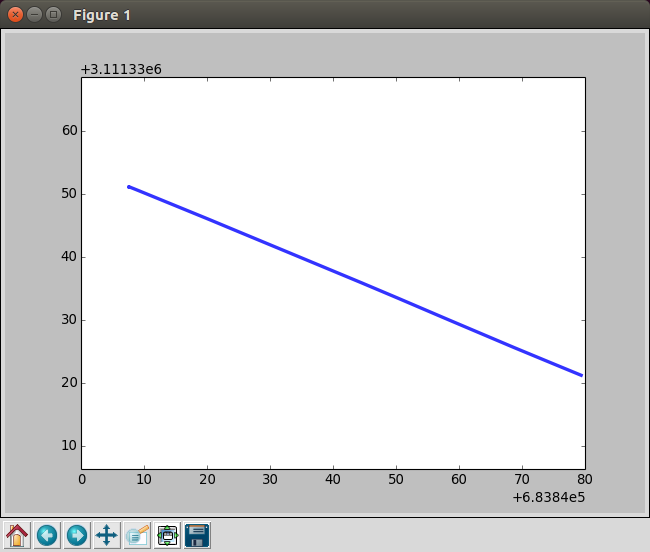
3.2 Smoothing Raw Data
If the data is not smooth enough when recording data, the extracted bare trajectory data may not be smooth and it is necessary to smooth it. Continue to use the following command within Docker to complete the smoothing process:
| 1 | Bash smooth.sh ./path_2018-04-01-09-58-00.bag.txt 200 |
**Note: In the above command, 200 is the length of the smoothing process. This value is generally 150-200. If the execution fails, try adjusting the parameter and smoothing it again.
In order to verify the correctness of the smooth result, you can use the following command to view:
| 1 | Python viewer_smooth.py ./path_2018-04-01-09-58-00.bag.txt ./path_2018-04-01-09-58-00.bag.txt.smoothed |
Among them, the first parameter ./path_2018-04-01-09-58-00.bag.txt is raw data, the second parameter ./path_2018-04-01-09-58-00.bag.txt.smoothed Is a smooth result, the display effect is similar to the following figure:
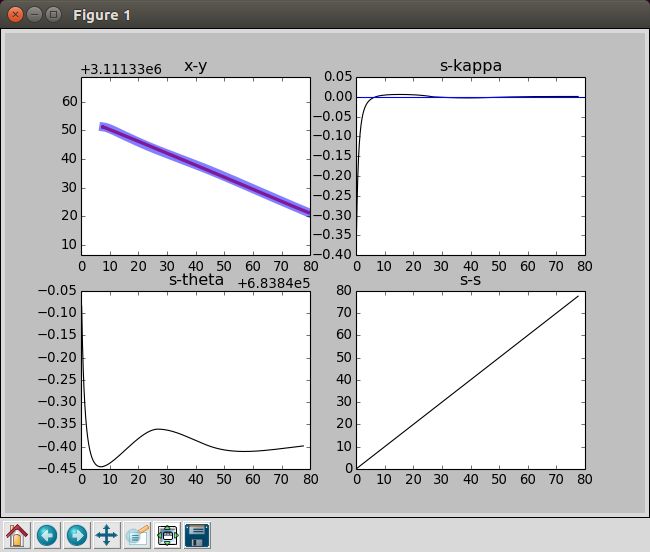
{four}
Dreamview front-end compilation and configuration
Dreamview front end uses Baidu map by default, but it can also be modified as Google Maps, but you need to recompile the Dreamview front end and set the UTM area correctly. The specific method is as follows (** Note: If you do not need to modify the map settings, you can ignore steps 4.1-4.2, directly Perform step 4.3):
4.1 Changing Navigation Map
Open the file [apollo project root]/modules/dreamview/frontend/src/store/config/parameters.yml and replace the following with Google Maps or Baidu Maps as needed:
| 1234567 | Navigation: # possible options: BaiduMap or GoogleMap map: "BaiduMap" # Google Map API: "https://maps.google.com/maps/api/js" # Baidu Map API: "https://api.map. baidu.com/api?v=3.0&ak=0kKZnWWhXEPfzIkklmzAa3dZ&callback=initMap" mapAPiUrl: "https://api.map.baidu.com/api?v=3.0&ak=0kKZnWWhXEPfzIkklmzAa3dZ&callback=initMap" |
4.2 Recompiling the Dreamview Front End
Enter Docker as in step 1.2. Run the following command to compile the Dreamview front end:
| 123456 | # Install the Dreamview front-end dependencies. Note that this step is performed only once. You do not need to run cd /apollo/modules/dreamview/frontend/yarn install# to compile the Dreamview front end. cd /apollobash apollo.sh build_fe |
The compilation process may have the following error:
| 1234 | ERROR in ../~/css-loader!../~/sass-loader/lib/loader.js?{"includePaths":["./node_modules"]}!./styles/main.scss**Module Build failed: Error: ENOENT: no such file or directory, scandir '/apollo/modules/dreamview/frontend/node_modules/node-sass/vendor'*... (there is a long list, no longer listed) |
This is caused by inconsistent internal dependency packages. The solution is as follows:
Inside Docker, run the following command (Note: Be sure to keep the network unblocked, otherwise you will not be able to download the dependencies again):
| 12345 | Cd /apollo/modules/dreamview/frontend/rm -rf node_modulesyarn installcd /apollobash apollo.sh build_fe |
4.3 Configuring the UTM Area ID
Open the file [apollo project root]/modules/common/data/global_flagfile.txt, and add the following statement in the last line (this is the UTM zone ID in Changsha area. For the Chinese UTM zone, please refer to this page [http://]):
| 1 | --local_utm_zone_id=49 |
{ Fives }
The use of navigation mode 5.1 Open Dreamview and open the navigation mode
Go to Docker and start Dreamview. The command is as follows:
| 1234567 | Cd your_apollo_project_root_dir# If you do not start Docker, start it first, otherwise ignore this step bash docker/scripts/dev_start.sh -C# Enter Dockerbash docker/scripts/dev_into.sh# Start Dreamview background service bash scripts/bootstrap.sh |
If the offline simulation test, the data packet recorded in Step 2/apollo/data/bag/2018-04-01-09-58-00.bag (this is the recording data on my machine) is played in a loop; if it is The actual car debugging, then ignore this step.
| 12 | # In the case of a simulation test, the recording data is played repeatedly; this step is ignored in the real car debugging situation. rosbag play -l /apollo/data/bag/2018-04-01-09-58-00.bag |
Open the webpage in the browser http://localhost:8888 (be careful not to use the proxy), enter the Dreamview interface, click the drop-down box in the upper right, set the mode to Navigation (Navigation mode), as shown below:
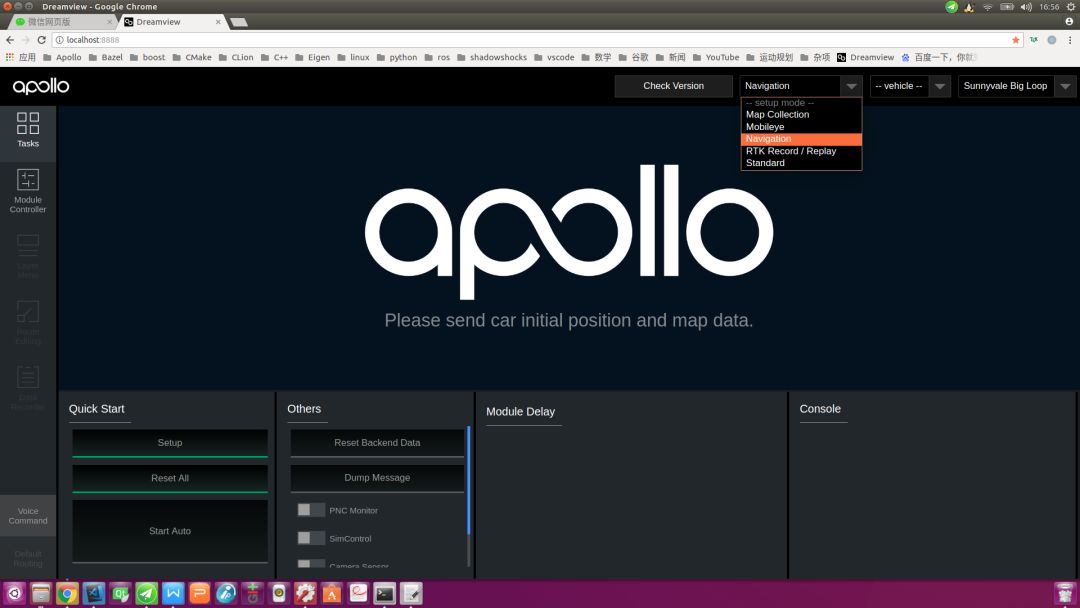
5.2 Open Dreamview Navigation Mode Options
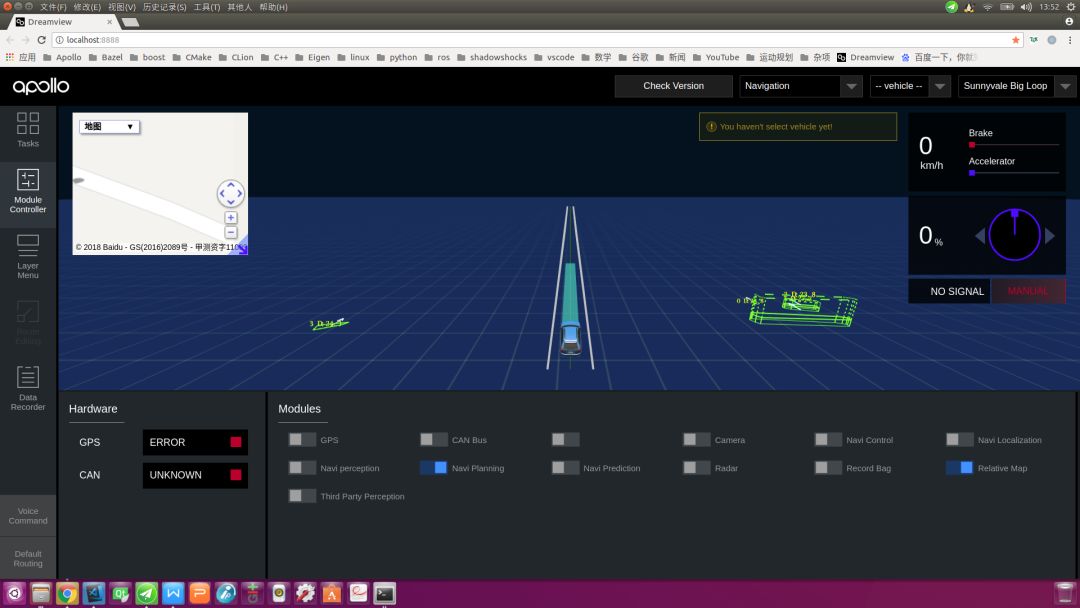
Click the Module Controller button in the left toolbar of the Dreamview interface to enter the module control page. If the offline simulation test, select Relative Map, Navi Planning options, other modules are opened as needed, as shown below (The module that displays the blank text in the figure is the Mobileye module, which can be seen after the relevant hardware is installed and configured):
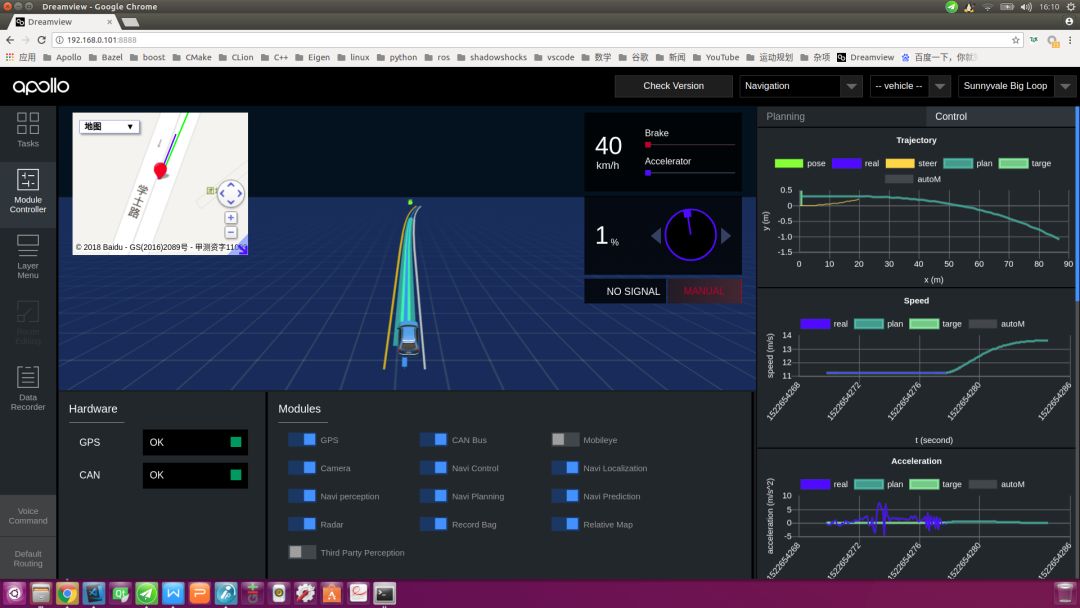
If it is a real car debugging, it is recommended that all other modules except the Record Bag, Mobileye (if the Mobileye hardware is not installed, it will be displayed as blank text) and the Third Party Perception module are all enabled, as shown in the following figure:
5.3 Sending Reference Line Data
Inside Docker, use the following command to send the reference line data created in step 3:
| 12 | Cd /apollo/modules/tools/navigatorpython navigator.py ./path_2018-04-01-09-58-00.bag.txt.smoothed |
The following figure shows the interface after Dreamview receives the reference line under the offline simulation test. Notice that the Baidu map interface has appeared in the upper left corner of the interface. The reference line we sent is in the Baidu map with the red line and the main interface with the white lane line. The way to show.
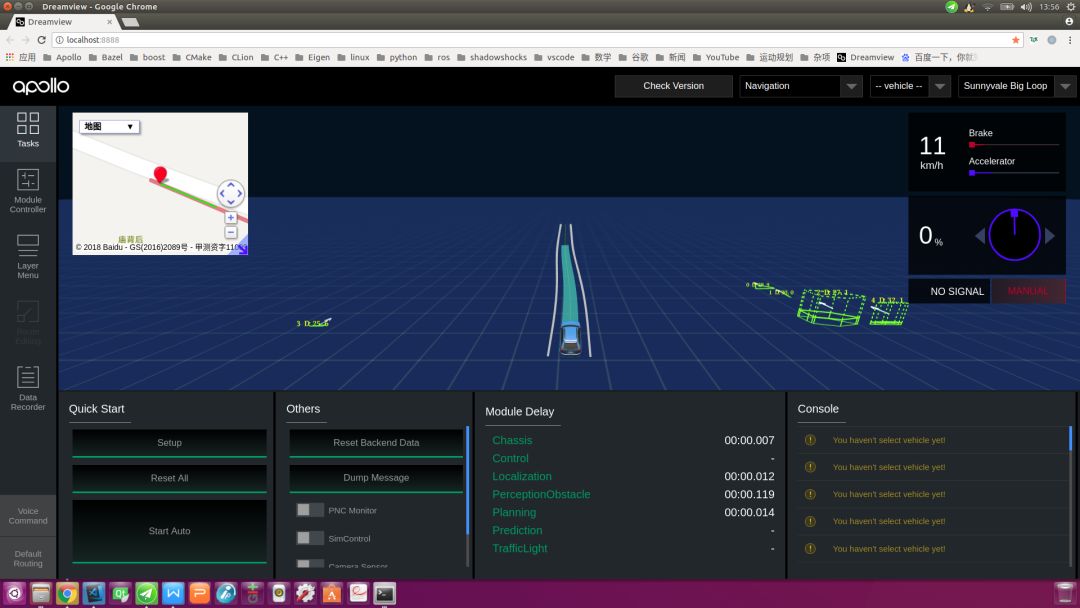
The following figure shows the interface after Dreamview receives the reference line in the real car debugging situation. Notice that the Baidu map interface has appeared in the upper left corner of the interface. The reference line we sent is in the Baidu map with the red line and the main interface with the yellow lane line. The way to show.
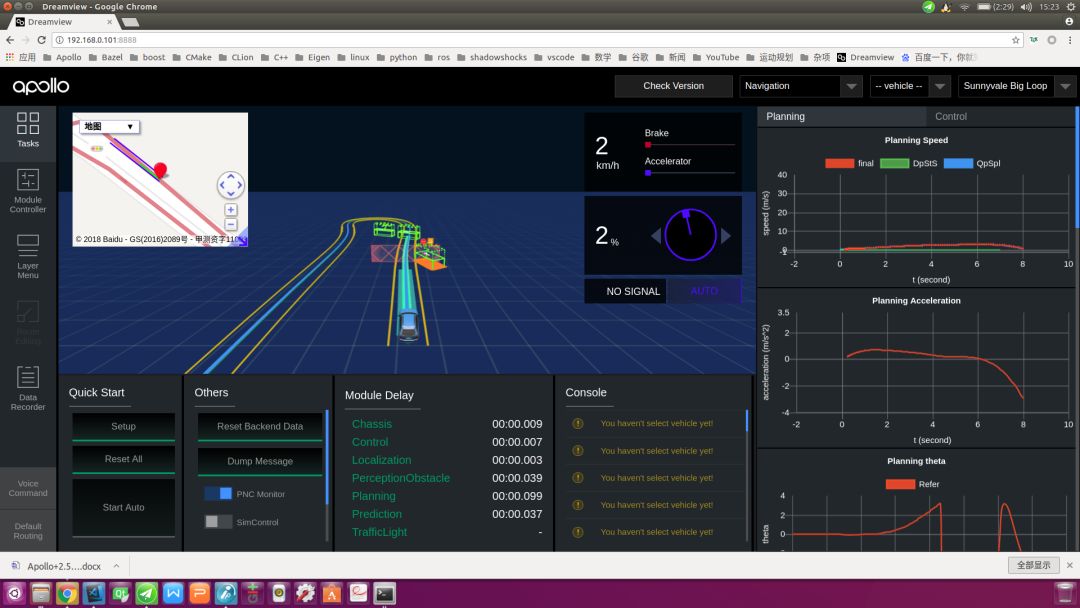
Pay attention to the following points:
(1) If the Dreamview interface does not display the reference line correctly after sending the reference line data, there may be the following reasons: First, the reference line data is not sent correctly. The solution is to execute the send command again; second, the browser cache is inconsistent and the solution is The method is to press Ctrl + R or F5 key to refresh the display, or clear the browser cache; Third, the Dreamview background service program is running abnormally, the solution is to restart the Dreamview background service inside Docker, the command is as follows:
| 1234 | # Stop the Dreamview background service bash scripts/bootstrap.sh stop# Restart the Dreamview background service bash scripts/bootstrap.sh |
(2) Every time the vehicle returns to the starting point, it is necessary to send the reference line data again whether it is the offline simulation test or the actual vehicle debugging.
This article introduces Apollo 2.5's new navigation model based on relative maps. New features will effectively reduce the developer's usage threshold. I hope this article helps everyone!
Since the opening of the Apollo platform has come, we have received a lot of developer's advice and feedback, more and more developers based on Apollo wiped out more sparks, and is willing to contribute their own results, which fully reflects the Apollo "contribution The more you get, the more you get the open source spirit. To this end, we have opened a "Developers Say" section, hoping that developers can actively contribute and contribute to creating a shared communication platform for the majority of autonomous driving developers!
Maskking is an electronic cigarette brand. Maskking vape is a popular brand of Disposable Pod systems and e-cigarettes that are designed to provide a convenient and easy-to-use alternative to traditional smoking. The company has a range of products that are known for their compact and sleek design, with a variety of flavors and nicotin strengths to choose from.
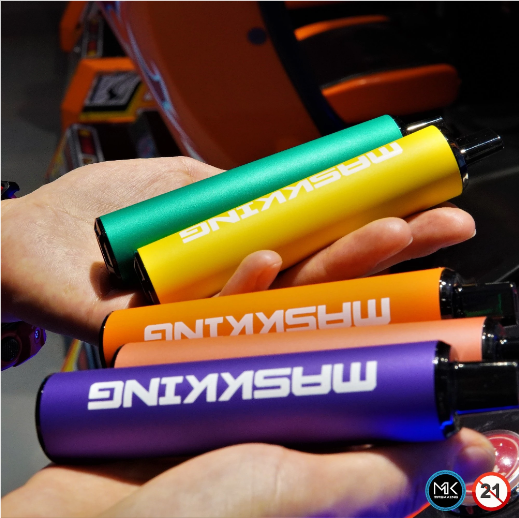
Maskking Vape,Maskking Vanilla Disposable Vape,Nicotine Free Disposable Vape,Maskking Vape Kit,Maskking Vape Pod
TSVAPE Wholesale/OEM/ODM , https://www.tsecigarette.com
