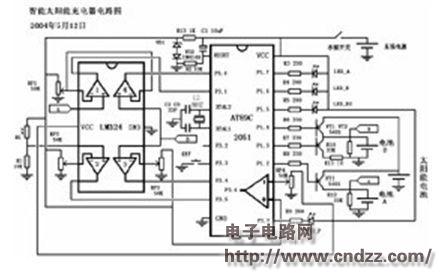
The solar charger designed in this paper is controlled by 89C2051, which can realize two-cell battery charging in turn, full of self-stop. It can be set to discharge, let it go, and it is compatible with NiMH and NiCd batteries.
Working principle: The water supply of the whole circuit is controlled by the mercury day, and the power is cut off when the charger is reversed. C1 and R2 form the power-on reset circuit of the single-chip microcomputer, and the detection circuit is composed of the analog comparators inside the LM324 and 89C2051. The op amp 1 detects the voltage of the battery A, and the RP1 sets the upper limit voltage of the batteries A and B, which is set to 1.4V. When the battery A is full, the upper limit voltage is exceeded, and the operational amplifier outputs 1 and vice versa. Op amp 2 detects the light intensity, RP2 sets the light intensity that allows charging, and the photoresistors RL and R1 form a voltage dividing circuit. When the light is strong, the resistance of the photoresistor is small, and the potential of the positive input terminal of the op amp is high, when the input potential is positive. When the potential is greater than the reverse input terminal, the op amp loses 1 and vice versa outputs 0. The operational amplifier 3 detects the lower limit voltage of the battery B.
RP3 sets the voltage value of the lower limit of battery B. Set here to 1V, the detection principle of the op amp 3 and the op amp 4 is the same as that of the op amp 1, and is not repeated. The internal analog comparator of the 89C2051 is used to detect the voltage of the system's power supply. If the power supply voltage is too low, the P3.6 bit is set to 1 to stop the system, otherwise the P3.6 is set to 0. R13, VD1, VD2 form the reference voltage circuit, and provide the reference voltage to the detection circuit. VD1 is a 2.4V voltage regulator tube, but the current may be too small. The voltage across VD1 is only 1.7V, so it is serialized again. Only IN4148, increase the reference voltage. R6, VT1 constitute the charging circuit of battery B, and R7, VT2, R11 constitute the discharge circuit of battery B. R8 and VT3 constitute a charging circuit of battery A. R3, R4, R5, and R9 are current limiting resistors of LED_A, LED_B, LED_B2, and LED_P, respectively. LED_A indicates the status of battery A (Note: In order to save power, all LEDs are normally off, only displayed when the button is pressed, and only displayed for 4 seconds). Steady light indicates that the battery is fully charged, of course, the sun is sufficient, and the A battery case will always be on when there is no battery; the flashing indicates that it is charging; the off indicates that the battery is insufficient, but it is not charging. LED_B indicates the state of battery B. The principle is the same as LED_A. The help is not repeated. LED_B2 indicates the discharge state of battery B. When it flashes, it indicates that it is discharging. When it is extinguished, it indicates that it is not discharging. LED_P indicates the power status, always on indicates that the power is sufficient, and blinking indicates that the power supply voltage is too low.
In addition, the maximum output voltage of the solar cell used in the charger is 2.5V and the maximum current is 120mA. Assuming that the battery with a maximum current of 1200mAh is charged for at least 10 hours, to increase the charging speed, the number of solar cells can be increased by paralleling.
The solar charger is designed to have a discharge function (only B battery has a discharge function), so it is compatible with nickel-metal hydride and nickel-cadmium batteries; since the upper and lower voltages can be detected, there is no need to worry about the battery being overcharged or over-discharged; As the system power switch, as long as the charger is reversed when not in use, the system power is automatically cut off. When it is used, the solar cell is up, just the mercury switch is turned on, and the automatic power-on is realized, which makes the use more convenient.
Instructions for use:
1 Put the battery on the battery case and the battery to be discharged (for example, the nickel-cadmium battery can only be placed in the B battery case).
2 If battery B is allowed to discharge, press the discharge button. If battery B discharge is prohibited, press and hold the discharge button. After booting, the system disables discharge by default.
3 If the crash occurs unfortunately, just reverse the charger and restart it.
4 If you do not use the charger for a long time, please remove all the batteries (including the button battery) to prevent leakage and damage the charger.
With smart solar charger circuit diagram:

Main Marine Diesel Generator,Off Shore Diesel Generator,Platform Marine Generator,Marine Propulsion Engine
Jiangsu Vantek Power Machinery Co., Ltd , https://www.vantekgenerator.com
