
In this article, I will discuss a tool for analyzing CPU usage in Python. CPU analysis measures the performance of the code by analyzing how the CPU executes the code to find out what is wrong with the code and then process them. Next we will look at how to track the CPU usage when using Python scripts, focusing on the following aspects: 1, cProfile 2, line_profiler 3, pprofile 4, vprof
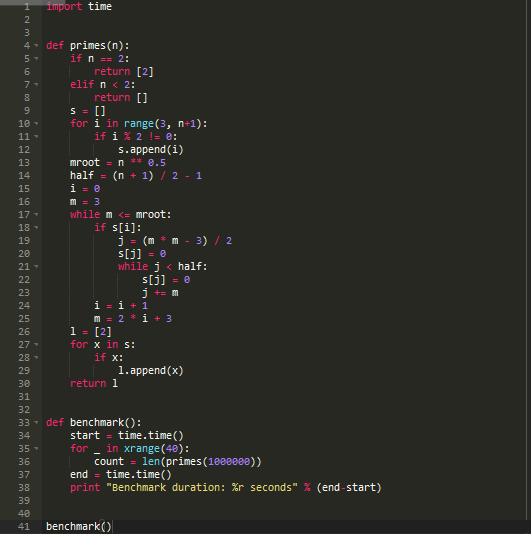
Measuring CPU Usage For this article, I will mainly use the same scripts used in memory analysis, as follows:
Also, keep in mind that in PyPy2, you need to use the version of pip that works with it:

And other dependencies will also be installed:

One of the most commonly used tools for cProfile when discussing CPU analysis is cProfile, mainly because it is built into CPython2 and PyPy2. This is a deterministic parser, which means that a set of statistics is collected when the program is run, such as the number of executions or execution times of various parts of our code. In addition, cProfile has less overhead on the system than other built-in parsers (profiles). The usage of CPython2 is simple:

If you use PyPy2:

Its output is as follows:
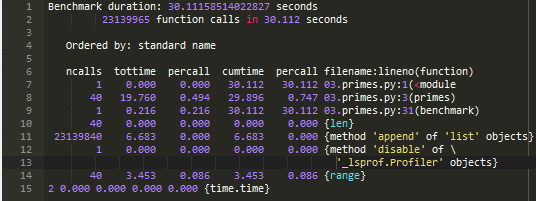
Even with this text output, it's easy to see that our script calls the list.append method multiple times. If we use gprof2dot, we can see the cProfile output graphically. To use it, we must first install graphviz, followed by some dependencies, and finally use the following command on Ubuntu:

Run the script again:

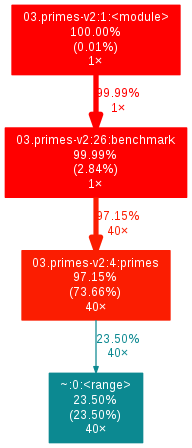
We get the following output.png file:

This makes it easier to see everything. Let's take a closer look at its output. You can see the function calls in the script as follows: 1, the first line: Python file name, line number and method name 2, the second line: the percentage of the code block takes up all the time 3, the third line: in parentheses, the method itself Percentage of total time 4, fourth line: the number of times the function is called. For example, in the third red square at the top, the method primes takes up 98.28% of the time, of which 65.44% of the content is in it, and 40 times. The rest of the time is spent in list.append (22.33%) and range (11.51%) in Python. As a simple script, we only need to rewrite our script, as shown below:

If we use CPython2 to measure the time of our script,

There is also PyPy2:

We got good results by using PpyPy2's CPython2 and 3.1X. Here is the call flow diagram of cProfile:
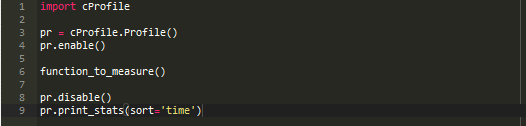
You can also use cProfile programmatically, for example:
This is useful in some situations, such as multi-process performance measurement
Line_profiler This analyzer provides information about the workload at the row level. It is implemented in C using Cython and compared to cProfile and found to have less overhead. The source code can be found here, or you can find the PyPI page here. It has the same overhead as cProfile, but it takes 12 times to get the configuration file. To use it, you need to first add it via pip: pip install pip install Cython ipython == 5.4.1 line_profiler(CPython2). One of the main drawbacks of this parser is that it does not support PyPy. Just like using memory_profiler, you need to add a decorator to the function you want to analyze. In our example, you need to add @profile before defining our primes function in 03.primes-v1.py. Then call it:

You will get the following output:
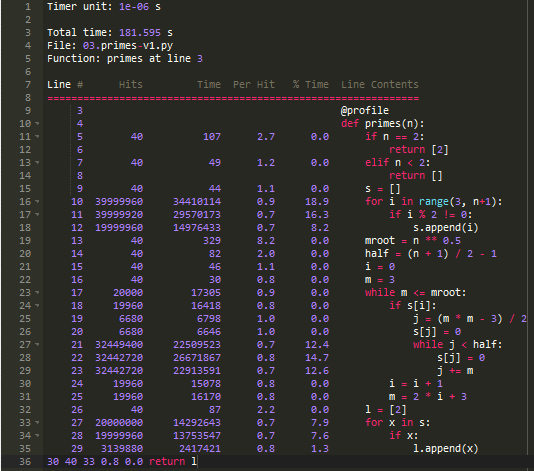
We saw that the two cycles of repeatedly calling list.append took the most time.
According to the author's note, pprofile is a "pure python parser for thread measurement and statistics." It is inspired by line_profiler and fixes a lot of shortcomings, but since it is written entirely in Python, it can also be used successfully with PyPy. Compared to cProfile, the analysis time is 28 times more when using CPython, and 10 times more when using PyPy, and the level of detail is more refined. We also support PyPy! In addition, it supports profiling threads, which can be convenient in a variety of situations. To use it, you need to add it via pip: pip install pprofile(CPython2)/ pypy -m pip install pprofile(PyPy) and then call it:

The output is different from what we have seen before, we get the following results:

We can see everything in more detail now. Let's take a look at the output. You can get the entire output of the script, and before each line, you can see the number of calls made to it, the run time (in seconds), the time of each call, and the percentage of global time. pprofile adds extra to our output. The lines (such as lines 44 and 50, starting with (call)) and cumulative indicators. Again, we see that the two loops that repeatedly call list.append took the most time in our script.
Vprofvprof is a Python parser that provides rich interactive visualization of various Python program features such as runtime and memory usage. It is a result of a graphical display based on Node.JS in a web page. Using it, you can see one or all of the following related to Python scripts: 1. CPU usage Figure 2, code analysis 3, memory map 4, code heat map To use it, you need to add it via pip: pip install vprof (CPython2)/ pypy -m pip install vprof(PyPy), then call it: On CPython2, display the code heat map (the first call is as follows) and the code analysis (the second call below):

On PyPy, the code heat map (the first call is as follows) and the code analysis (the second call below) are displayed:

In each case, you will see the following content of the code scatter plot

And the following content of code analysis.

The results are graphically seen, we can hover the mouse or click on each row for more information. Again, we see that the two loops that repeatedly call list.append took the most time in our script.
Transparent Led Display,Transparent Led Screen,Transparent Led,Led Transparent Screen
ShenZhen Megagem Tech Co.,Ltd , https://www.megleddisplay.com