Recently, I was fortunate to get a very popular module of RAK (Switzerland) – WisCam, interested Maker has long been eager to try this fascinating Camera module. Information about the hardware specifications (CPU, FLASH, Camera, I/O, WiFi module) of the WisCam development board can be found in the article by Ches, so I will not explain more here. This article mainly wants to share with you some of the features and experiences I used when using WisCam.
RAK This WisCam product is really scary, not only the price is very close to the people (very suitable for a poor man like me), the completeness of WisCam's entire suite allows Maker to get started very quickly (basically as long as the plug-in, download APP With WiFi, you can use it). In addition, another highlight is that this WisCam has support for Arduino compatibility, which is undoubtedly a great boon for the rookie Maker.
After seeing the camera lens on the App, I immediately decided to study what the WisCam, which has recently had a very high volume in the Maker world, has a lot to offer. Before playing WisCam, there was a little time to research webcam for image recognition, so this time I feel a little bit inexplicable about studying WisCam. Of course, I would say this because WisCam can do the same.
WisCam itself is divided into two working modes, UVC (USB camera: webcam form) and WiFi Camera. These two working modes use different power-on methods. To use the UVC mode, just like a webcam, plug in the micro USB to connect the laptop or PC. If you use the WiFi camera, connect the 5V through the Arduino UNO, or Connect the WisCam development version directly to the power supply with micro USB.
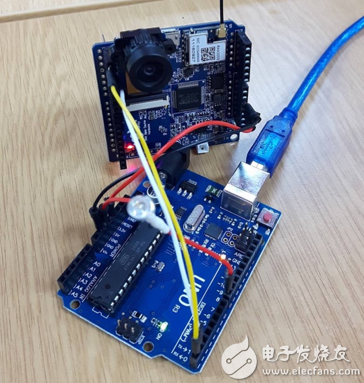
This wiring is to let Wiscam run in WiFi camera mode.
(Off topic: If you don't use their original factory line, picking up my MAC with your own micro USB will be a WiFi camera mode! It's amazing! But I haven't figured out why.)
The easiest and most common application of WisCam is to use the downloaded app on the mobile phone under WiFi camera mode. (RAK is very popular this time. iOS and Android apps are open source for everyone to use, you can find the download link directly by Google) With the WisCam AP, you can immediately view the lens image from your phone.
Since I want to try the WisCam's remote observation function, first open the UVC mode and focus on sharing the use of the WiFi camera mode.
I especially want to try RAK's "remote monitoring" because I was trying to get someone to see my webcam from different networks when I was playing webcam. It was done by ngrok (in fact, ngrok is not like this. Used, but for fun is enough), so I was very curious about how WisCam did remote monitoring and found that it built a Nabto P2P cloud inside.
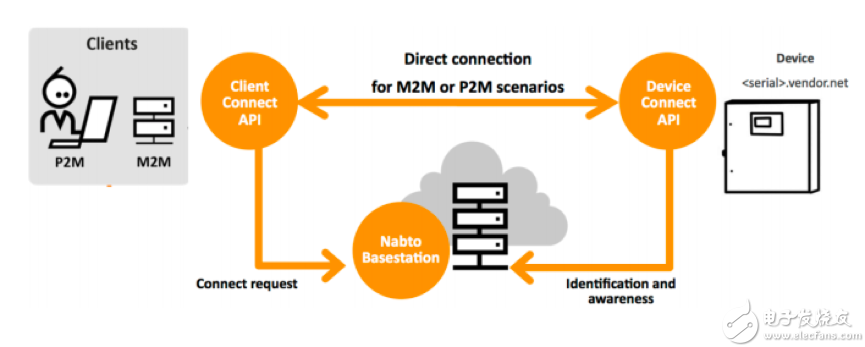
Nabto platform operating mechanism diagram
The operation of Nabto P2P cloud is as shown in the figure above. The Device side is a development version with networking function (such as Arduino MEGA2560 + Wiznet W5100 Ethernet Shield), which is registered by appmyproduct (described below). The License Key identifies itself in the Nabto Basestation, and the Client accesses the connected device through the App (related to appmyproduct). When the request is sent, the Device ID of the access device is sent to the Nabto Basestation for P2P connection. .
Device or Client (app) To have the ability to establish a relationship with Nabto Basestation, it is necessary to add their own SDK - uNabto SDK. The strength of this SDK, he can support many common network development versions, even my favorite ESP8266 is also inside! It really makes me tickle, a concept that I really want to play!
The appmyproduct mentioned above is Nabto in order to speed up the development of the "remote monitoring" application, so release a set of App templates that communicate directly with the Nabto platform, meaning that if you are willing to spend time, you can write your own mobile app, just To add the uNabto SDK to remote monitoring with Nabto cloud, I believe that you won't want to focus on developing apps.
There are also different app forms for different scenarios, which are super friendly! In addition to the App template, just mentioning the registration Device ID and the License Key are also done on appmyproduct. As long as you apply for an account, you can create a project and generate a License Key (the Device ID will appear together) as shown below.
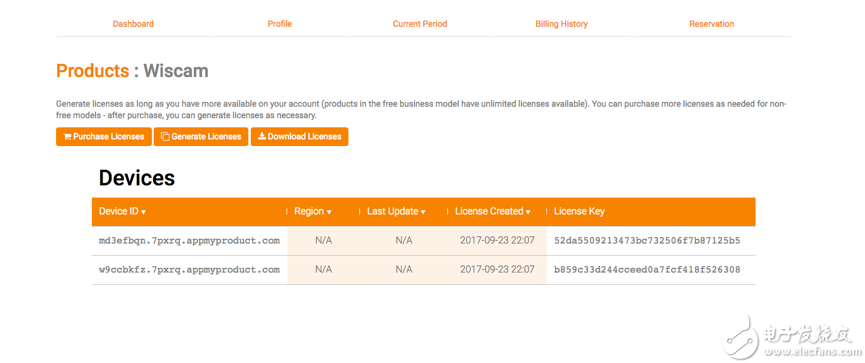
This Device ID and License Key are placed in the code of the Device, so that Device can tell Nabto Basestation who I am based on the above information, so that the App can remotely monitor certain behaviors of Device.
What about WisCam? In fact, the example of the Arduino MEGA2560 + Wiznet W5100 Ethernet Shield was replaced by WisCam and you're done. That is to say, the WisCam supports the function of the Nabto P2P cloud in the file. The WisCam is like this. In the WiFi camera mode, connect to the WisCam with a laptop WiFi and then type it in the address bar of the browser: http://192.168.100.1 /cgi-bin/param.cgi?action=list&group=nabto You can see something like the following image:

The above Nabto id is like the Device ID registered in appmyproduct, and the open source app released in RAK itself already has the uNabto SDK, which can be paired by entering the WibCam's Nabto id from the app.
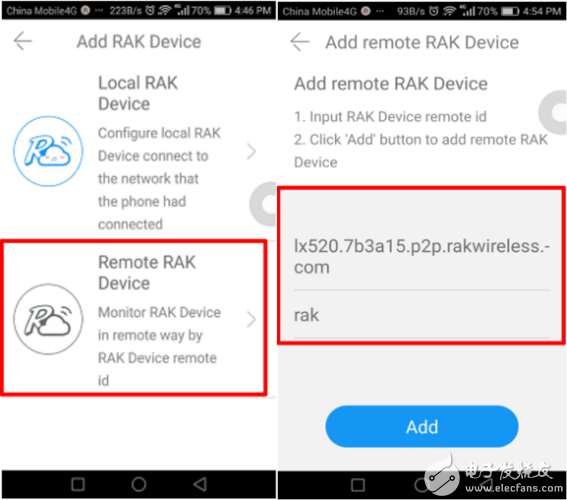
However, when I tried to connect directly, I found that the result of "NTCS_CLOSED" appeared. I found out that the "end device is not connected". Why is this? I mentioned WisCam's use of WiFi camera mode at the beginning. This simple use default is AP mode (that is, it can only be used). If WisCam can be remotely monitored, it must be converted to STA mode. Only then can you connect to the network smoothly.
Here, let's clarify that the so-called remote control is that Device and App are under different networks, and the App can still access the Device through the network, and even design to control the Device.
RAK WisCam combined with Arduino's application
RAK WisCam This camera module I feel great advantages and advantages are compatible with Arduino, since it can be compatible with Arduino, I have any reason not to play a little creative to implement the application, look at the few The parts, suddenly a flash of light, thought of something interesting.
Since this camera module can only be oriented, it is better to add the two SG90 servo motors to the base with the joystick module on the hand side, so that the camera module can observe more than one direction of the picture, and the master version can be used. Arduino nano is all right.
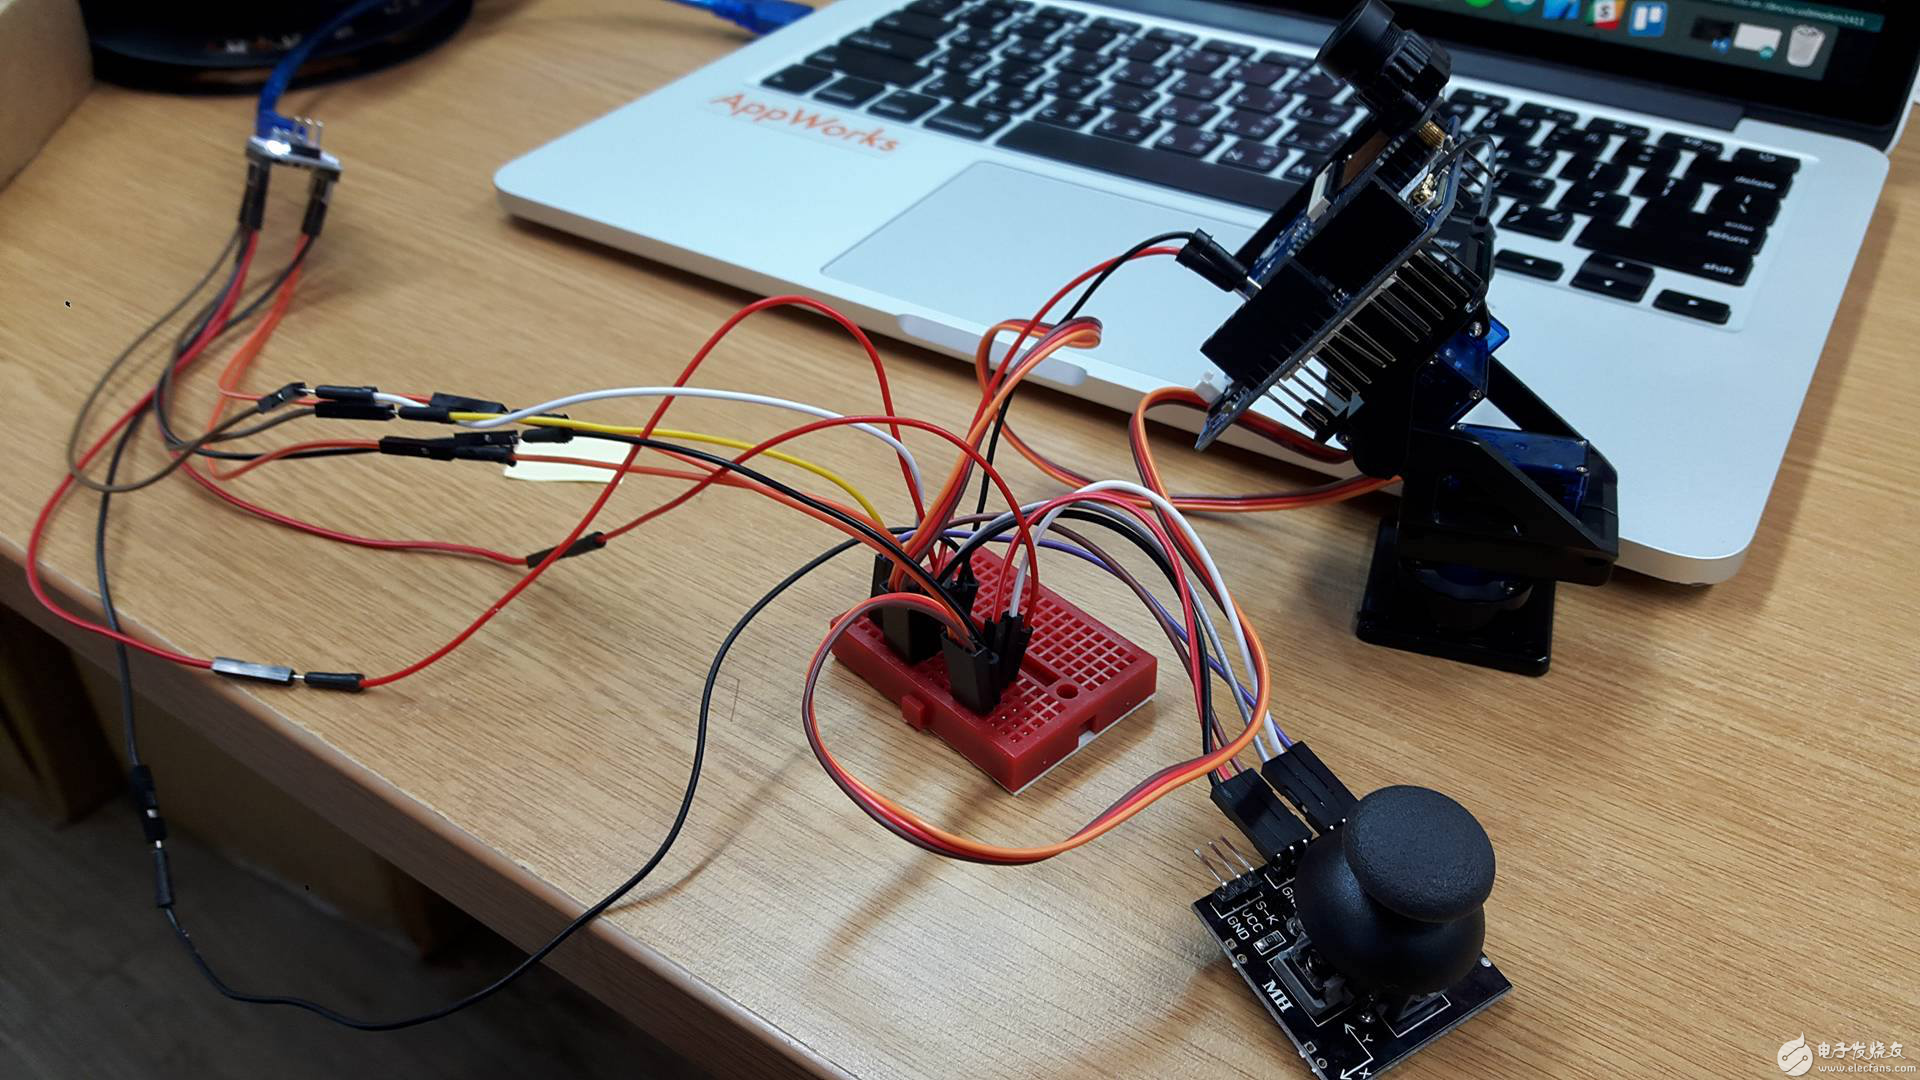 In fact, I would think of such an application because the company often has guest visits. If it is only directed observation, it is easy to miss the screen (because it is impossible to keep an eye on the mobile app), but if you can see a certain range (that is, The picture of the limit of the motor angle may be a little help. The following is my system architecture diagram:
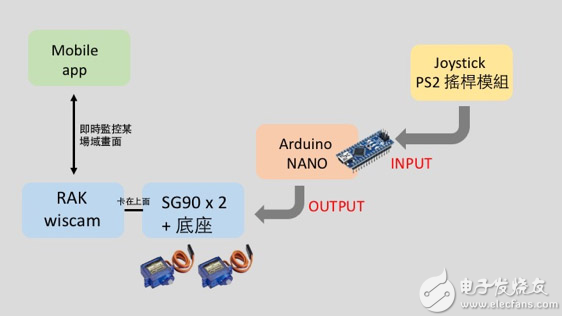
Architecture diagram of multi-angle monitor with WisCam plus Arduino NANO (Cartography: Ryan Hu)
Due to the lack of hand-held components, this is only the case, but my current idea is to use the joystick module to remotely control the motor (recently completed and added), so that I can clearly see a variety of apps on the phone's app. Angle of the picture.
As for the details of the implementation, this article will not be detailed. Here, only some learning resources are provided. For example, the Arduino motor control can refer to Ye Dang. This "Arduino Exercise: Servo Motor with Tower Pro SG90 as an Example", Joystick Joystick Control Please refer to Motoduino's "XY Dual-Axis Analog Joystick Module". As for how to use the Arduino to control the motor with the joystick, you can find the teaching solution in the article "Arduino Controls the Server Motor with Joystick" by Babel. .
PS If you can do image recognition, it is even more fun!
in conclusion
Finally, at the end of the article, I want to say that WisCam does allow Maker to get started quickly. It is a fun development kit, but there is still room for improvement. Here are two suggestions.
First, although it supports Arduino, it can indeed use UNO to connect to 5V, even using UART to communicate, but I feel that the space that WisCam itself can play is insufficient, even if the whole package of WisCam source code can be downloaded, but I don't know where to start (probably because I am still too busy).
Secondly, WisCam seems to be able to do more experiments under Linux. It is not a friendly thing for Maker who is not using Linux.
But overall the experience is very good. For those Maker who want to experience the IP camera quickly but don't have too many silver bullets, try this WisCam, CP is quite high!
Wiscam Taobao purchase link: https://item.taobao.com/item.htm?spm=a1z10.5-c.w4002-14938546650.18.638a2e6T0NUOm&id=543901093786
Ungrouped,Pu Leather Iphone Case,Best Pu Leather Phone Case,Pu Leather Phone Case For Sale
Guangzhou Jiaqi International Trade Co., Ltd , https://www.make-case.com
